DIY Fabric Pumpkins: An Easy No-Sew Tutorial
Make plump no-sew fabric pumpkins from a circle of cloth, stuffing and twine. Includes circle sizes for small, medium and large pumpkins, fabric advice and three easy stems.
Project at a glance
What you need
- Cotton, flannel or velvet-look fabric
- Polyester stuffing
- Jute twine
- Rubber bands
- Fabric scissors
- Stick, cork or brown felt for the stem
- Tacky craft glue or low-temperature glue gun
DIY fabric pumpkins are one of the friendliest fall projects there is: a circle of cloth, a handful of stuffing and a length of twine turn into a plump little pumpkin with no needle and no sewing machine. If you can tie a knot, you can make one.
This tutorial covers a single no-sew method from start to finish, with circle sizes for three finished pumpkins, so you can make a matching set in an evening.
What you need
- Fabric: one square a little larger than your circle for each pumpkin
- Polyester stuffing (fiberfill)
- Jute twine, plus a rubber band for each pumpkin
- Sharp fabric scissors and a pencil or chalk
- A dinner plate, mixing bowl or pot lid to trace around
- A stem: a short dry stick, a cork or a strip of brown felt
- Tacky craft glue or a low-temperature glue gun
Choosing fabric for fabric pumpkins
Almost any woven or knit cloth works, but each behaves a little differently when it is gathered.
- Cotton (quilting cotton, old shirts, bandanas) is thin and easy to gather, which makes it the best choice for small pumpkins.
- Flannel is soft and slightly thicker, and it hides lumpy stuffing well.
- Velvet-look fabric (stretch velvet or velour) gives a rich, smooth pumpkin. It is slippery, so hold the gathers with a rubber band before you tie.
- Burlap and heavy canvas are stiff and bulky at the gathers. Save them for large pumpkins only.
For a set that looks planned rather than random, pick two or three colors and repeat them. The guide to fall color palette ideas shows how to choose shades that sit well together.
Circle sizes for three finished pumpkins
A gathered circle makes a pumpkin a little less than half as wide as the circle itself. These figures are estimates, because soft fabric and firm stuffing both change the result.
| Finished pumpkin | Fabric circle | Stuffing | Twine for segments |
|---|---|---|---|
| Small, about 3.5 inches (9 cm) wide | 10 inches (25 cm) across | About one loose handful | About 1 yard (0.9 m) |
| Medium, about 5 inches (13 cm) wide | 14 inches (36 cm) across | About two to three handfuls | About 1.5 yards (1.4 m) |
| Large, about 7 inches (18 cm) wide | 20 inches (51 cm) across | About five to six handfuls | About 2 yards (1.8 m) |
A dessert plate, a dinner plate and a large pot lid come close to these three sizes, and a slightly uneven circle disappears inside the gathers.
How to make a no-sew fabric pumpkin
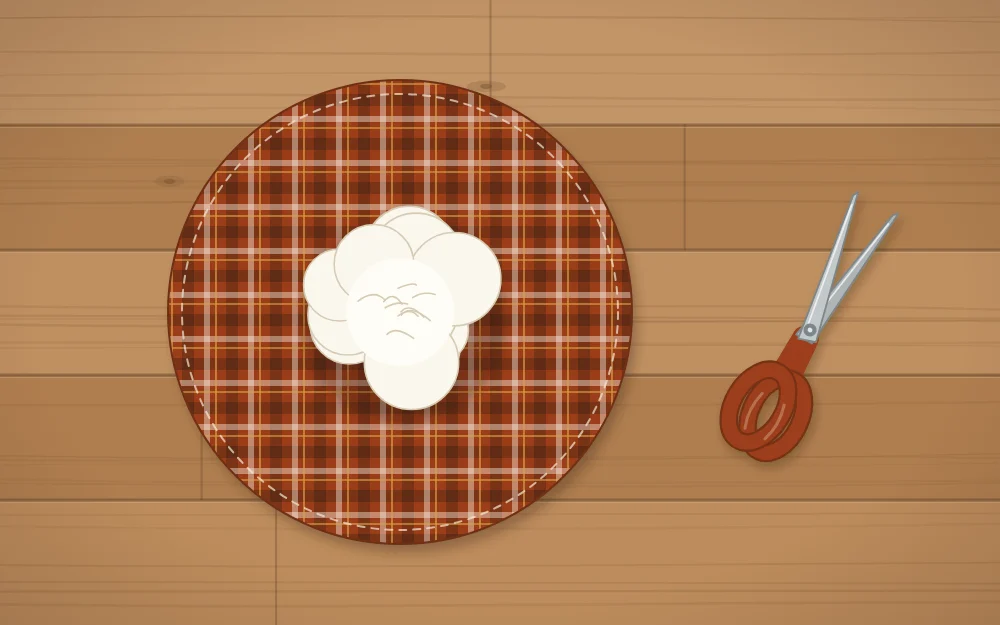
- Cut the circle. Lay the fabric face down, trace around your plate and cut along the line.
- Add the stuffing. Keep the fabric face down and pile stuffing in the center. Pull the stuffing apart into a fluffy mound first; tight clumps make a bumpy pumpkin.
- Gather the edge. Lift the edge of the circle up and around the stuffing, pleating it evenly with your fingers as you go, until all of the edge meets at the top.
- Secure the top. Wind a rubber band tightly around the gathered fabric, about an inch (2.5 cm) below the raw edge.
- Shape it. Press down gently on the top so the pumpkin sits squat rather than round, and tug the pleats until they are evenly spaced.
Tip
Stuff a little less than you think you need. A slightly soft pumpkin shows its segments far better than a firm one, because the twine has room to sink in.
Wrapping twine to make the segments
The twine is what turns a fabric ball into a pumpkin. Each wrap runs from the top, down one side, under the base and back up the other side, so every wrap creates two grooves.
- Cut the twine to the length in the table and tie one end firmly around the rubber band, leaving a short tail.
- Run the twine down the side, across the center of the base and back up the opposite side. Pull it snug so it presses a groove into the stuffing, then loop it once around the gathered top to lock it.
- Turn the pumpkin and repeat, crossing the first wrap at the center of the base. Three wraps give six segments; four wraps give eight.
- Tie the working end to the starting tail with a double knot and trim.
If one segment looks fat, slide the twine sideways with a fingertip before you tie off.

Adding a stem
The tuft of fabric above the rubber band can be left as a ruffled top, or trimmed short and hidden under a stem. Three stems work well:
- A stick. Cut a dry twig to about 1.5 inches (4 cm). Brush off loose bark, push it into the center of the gathers and fix it with glue.
- A cork. A wine cork glued upright on the trimmed gathers makes a chunky stem for medium and large pumpkins.
- Rolled felt. Roll a strip of brown felt about 1 inch (2.5 cm) wide into a tight coil, glue the end down and glue the coil in place.
Finish with a few wraps of twine around the base of the stem to cover the rubber band. A low-temperature glue gun is quickest here, but it still burns skin, so keep fingers clear of the nozzle and the fresh glue.
The sweater sleeve variation
An old sweater sleeve is already a tube, so there is no circle to cut. Cut a section of sleeve about twice as long as it is wide. Turn it inside out, tie one end tightly closed with twine, then turn it right side out so the knot is hidden inside. Stuff it, gather the open end, secure it with a rubber band and wrap the segments exactly as above.
Where to use them and how to keep them
Group fabric pumpkins in threes with mixed sizes: on a bookshelf, in a wooden tray or along a shelf with a garland. The guide to fall mantel decor ideas explains how to arrange them with taller pieces. Like all fabric decor, keep them well away from stoves, heaters and any flame.
For a table full of pumpkins in different textures, mix a few of these with a paper pumpkin craft made from cardstock strips. At the end of the season, dust the pumpkins off and store them loosely in a breathable box or cotton bag so the stuffing does not get crushed flat.
Frequently asked questions
How big should the fabric circle be for a fabric pumpkin?
Plan on a circle a little more than twice as wide as the pumpkin you want. A circle about 10 inches across makes a pumpkin roughly 3.5 inches wide, 14 inches makes about 5 inches, and 20 inches makes about 7 inches. Thicker fabric and firmer stuffing shift those numbers slightly.
What can I use instead of polyester stuffing?
Fabric scraps, the filling from an old pillow or cut-up worn-out socks all work for decorative pumpkins. Scraps make a heavier, lumpier shape, so tear them small and wrap them in a thin layer of stuffing or batting if you have some. Avoid dried beans or rice, which can attract pests in storage.
Can I wash no-sew fabric pumpkins?
They are not built for a washing machine, since twine and glued stems can come loose. Shake or brush off dust, and spot clean marks with a barely damp cloth, then let the pumpkin air-dry fully. If one gets badly soiled, untie it, wash the fabric circle alone and rebuild it.